In this tutorial we will install
<a href="http://mary.dfki.de/" >Text-to-Speech System (MARY TTS)</a> and connect it with
<a href="http://mary.dfki.de/" > Baxter Robot </a>.The final output will be a synchronized action between Baxter's gestures and audio.
First we need have the <a href="http://sdk.rethinkrobotics.com/wiki/Workstation_Setup"> Baxter workspace set up </a>
After the workspace is set up we need to download <a href="http://mary.dfki.de/" >Text-to-Speech System (MARY TTS)</a> and VisualSceneMaker Baxter's branch
from <a href="https://github.com/SceneMaker/VisualSceneMaker/tree/VisualSceneMakerBaxter">VisualSceneMaker</a>. For downloading the latest VSM to work with
Baxter, execute in the terminal
<pre>
git clone -b VisualSceneMakerBaxter https://github.com/SceneMaker/VisualSceneMaker/
</pre>
###MARY TTS INSTALLATION
Go to the <a href="http://mary.dfki.de/download/index.html">Mary TTS website</a> and download the latest version of the software (The Runtime version)
As the MARY TTS is a server-client application, we need to have the server running in order to use it. So depending on your OS uncompress the downloaded
file and go to the bin folder and execute the <b><i>marytts-server.bat</i></b> for Windows or open a terminal and execute the <b><i>marytts-server</i></b> script.
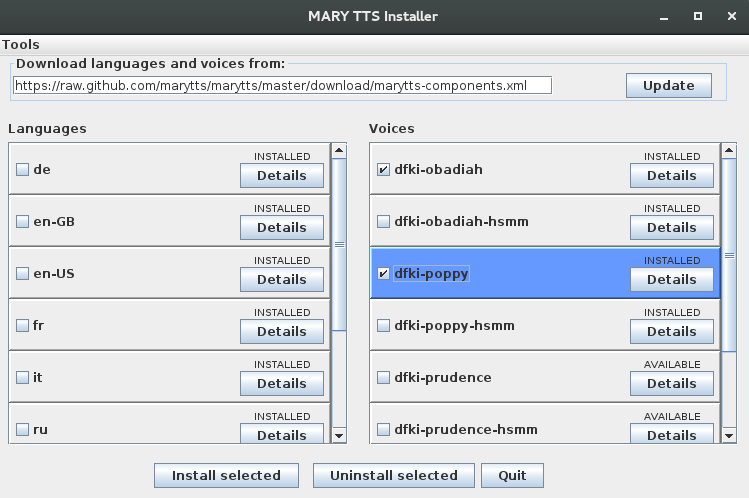
####MARY TTS VOICE INSTALLATION (optional)
By default there is only one voice installed, so if we want to integrate more voices in VSM we will need to install them.
Let's install two voices, namely **obadiah (man)** and **poppy(woman)**. Once again using the terminal go to the bin folder and execute the script
<b><i>marytts-component-installer</i></b>. When the window is opened select the language en-GB and then select the voices: "dfki-obadiah" and "dfki-poppy" and then
press the button "Install selected". Make sure the <b>en-GB Language is marked as installed</b> This could take a while depending on your Internet connection.
After everything is installed if you had the server running, stop it and execute it again using the script <b><i>marytts-server</i></b>.
###Connecting VSM with Baxter
Baxter is accesible using Pyhthon language. So in order to connect VSM with Baxter, we need a python server running. To this end, there is a
folder inside the VSM installation which consist of the server script and the script with the commands to make baxter move.
If you are still on the terminal go to where the VSM folder is.
after that.
Before running the python server we must indicate the ip where the baxter robot is connected. Just go the the baxter_server.py and edit the line where
the variable TCP_IP is defined and write the Baxter Ip address.
<pre>
1. cd /res/pybaxter.
2. cp -R * where_your_ros_workspace_is/src/baxter_examples/scripts
3. cd where_your_ros_workspace_is/
4. ./baxter.sh
5. cd where_your_ros_workspace_is/src/baxter_examples/scripts
6. python baxter_server.py
</pre>
If everything went fine, you should see the message <b>Listening...</b>
Now you can check the <a href="http://scenemaker.dfki.de/tutorials/tut_baxter.html">tutorial</a> about how to play around with Baxter using VSM
<H2>Configuring project.xml file:</H2>
<br/>
The <b>project.xml</b> is where we define, among other things which sceneplayer to use. This file is automatically generated when we create a new project.
By default VSM uses the default sceneplayer, so in order to work with Baxter we need to change this. Open the <b>project.xml</b> and under the tag <b>Players</b>
copy this lines:
<pre>
<Player name="defaultsceneplayer" class="de.dfki.vsm.players.BaxterSceneGroupPlayer">
<Feature key="vsm.agent.number" value="0"/>
<Feature key="vsm.agent.remote.host" value="127.0.0.1"/>
<Feature key="vsm.agent.remote.port" value="1313"/>
</Player>
</pre>
The class in the <b>Player</b> tag is indicating which sceneplayer we are going to use.
If your VSM and the Baxter scripts are on different computers, change the value of <b>vsm.agent.remote.host</b> to the IP address where the Baxter computer is located
If you want to use another port you can change the value of <b>vsm.agent.remote.port</b>. Notice that if you do this, you will need to change the port value in the python
script <b>baxter_server.py</b>
Back to Tutorials Index...